|


| |
Create/edit your WordPress ePortfolio
Sign Up ~ Edit/Update
~ Upload Artifacts ~ Creating
Links ~ Other
- Sign up
at WordPress.com
- Click on the orange Sign Up Now button
- Create an UNIQUE Username - your first/last name should be your
first try as it will be part of your domain, or web address
- Create a strong (good) password and confirm it
- Make note of both your Username and Password!
- Type in your E-mail Address
- Read and agree to the Legal Flotsam
- Choose: Gimme a blog!
- Click on the Next button
- Leave your Blog Domain as-is (or change it, but it makes sense to
leave your login and URL the same)
- Modify your Blog Name to read: ePortfolio of (your first/last
names)
- Leave Language as English unless you plan to share this with people
whose primary language is something else.
- Privacy: It's up to you. If you want only those to whom you send your
URL to know about your ePortfolio, do NOT check this box. If you're OK
with random visitors, check it.
- Click on the Signup button
- Add your first name
- Add your last name
- Copy/paste in your Overview from your resume here
- Click the Save Profile button
- As it says, "An e-mail has been sent to (your email address) to
activate your account. Check your inbox and click the link in the
message. It should arrive within 30 minutes. If you do not activate your
account within two days, you will have to sign up again."
- Do that. Activate your blog.
- On the resulting Your account is now active! page, click on the
Login text link.
- Enter your Username and Password.
- Check Remember Me if you're logged in at school but NEVER from a
public computer
- Click the Login button
- Editing/updating
your ePortfolio from the Dashboard view (once you're logged in)
- Creating a page (you will not need to create posts for your
ePort)
Click here for video tutorial: http://wordpress-tutorials.ithemes.com/27tutsunbranded/wp27_writepage.swf
- At the left, under Pages (you will have to click on the
arrow at the right to open the navigation tree), click: Add New
- In the header section, title your page
- Type ePortfolio of (your first/last name) here
- Copy/paste in your resume here
- If it doesn't paste in, here is a trick
- Paste it into a text document
- Select all
- Copy
- Then paste into your ePort
- Edit and format your resume as you see fit (less is more!)
- Do you want more editing options such as font, font
size, etc.?
Turn on the kitchen sink!
- You might need to cut/paste content around the page to
make it lay out as you wish
- Click the Update button as you're working to save your
edits
- Be sure to toggle back and forth between VIEW and EDIT mode so
you can see how it will appear
- Under Discussions, do NOT allow comments as this could
be an issue later
- At the right, click on the Publish button when you're
satisfied with the content of the page
- If you're not ready for it to be "live" then
click on the Save Draft button
- Under Attributes, leave your resume page as your Main
Page (no parent) as it needs to be the "Home" or top
level page of your ePort
- For the FAQ page, also set it to Main
Page (no parent) - That way a reader can easily flip back and
forth between pages
- Templates: Leave all pages as Default
- In the shortcut box (yellow box at top) click: View Page to
see how it looks in normal view, as anyone else other than you will
see it
- Uploading artifacts
(documents)
- Under the Media header (left side of page) navigate with the
arrows to the Add New option and click on it
- Notice that the only type of allowed files for a free account like
yours are as follows:
- Allowed file types: jpg, jpeg, png, gif, pdf, doc, ppt, odt, pptx,
docx.
- That means only image, PDFs, Word and Word2007 documents are
allowed
- If you plan to have video, you can always host it on your Box.net
(or another) account and then link to it
- Choose files to upload: Click on the Select Files button then
navigate to the target file
- Double-click on the file
- Wait patiently for it to upload
- Once it's uploaded, the resulting page will have an area like
this:
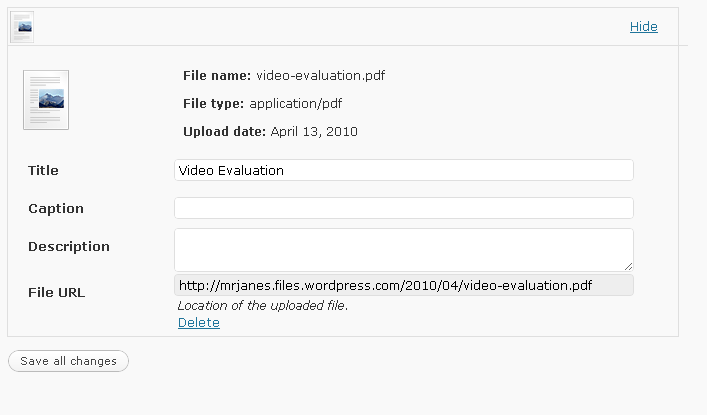
- Leave the title as it is or change it if you wish - the title is
what you will look for when you link text to these files
- Unless you plan to have it on-screen (which you don't), you don't
need a caption
- You don't need a description
- Click the Save All Changes button
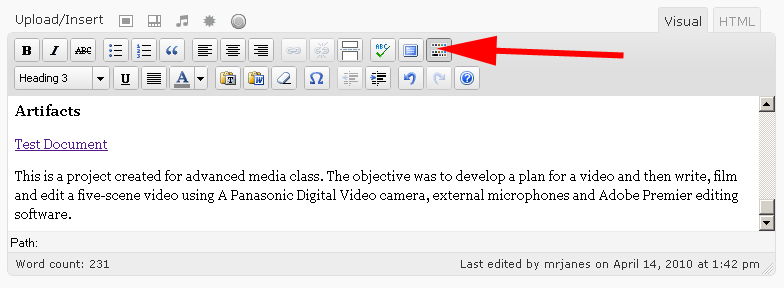
- Creating Links
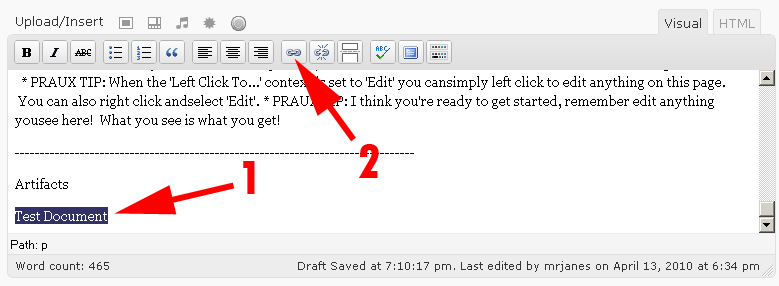
- 1) Highlight the text you want to be the link
- 2) Click on the Insert/edit Link button at the top of the
editing window
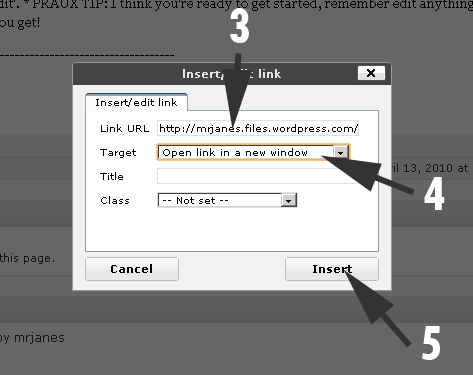
- 3) Paste in the link to the media you already uploaded
- To get this link, you will need to click on the Media link, then
the file, then copy the File URL at the bottom of that screen
- 4) Choose Target to be Open link in New Window
- 5) Click Insert
- Other
- Appearance: You may change your theme but remember, less is
more. You can potentially turn off a prospect by tricking out your
ePortfolio.
- General: Remove the "Just another WordPress.com weblog"
text and save.
- Delete all other pages, posts and links so only the content you create
is available. Do not create them or any widgets, ratings, polls, etc.
If you share your opinion on anything, it could work against you. even
an interest could be misconstrued. You cannot take that chance. Your
duty is to get approved, not share your take on anything.
- NEVER post your photograph in an ePortfolio, if you can help it. This
avoids prejudice.
- Remember, this is to be a professional ePortfolio. It's not a Facebook
or MySpace page. If you clutter it with ANYTHING not directly related to
your experiences, it WILL work against you when someone is deciding
between you and someone else for a scholarship, admission or job.
|
